Sign your git commits using SSH keys
Why sign your commits? #
Before you can use git on your machine, you have to set your name and email address in the git configuration. That information is embedded into each commit you create and can displayed in the git command line and on services like GitHub.
But the author information in commits is just a bit of text pulled from a configuration and is not verified. That means anyone could change their local git configuration and type in your name and email address and push commits pretending to be you.
If you choose to sign your commits using cryptographic keys, that signature will be included alongside the commit and author information, meaning others can be (reasonably) certain that it was you who made those commits and not someone pretending to be you.
For example, on GitHub signed commits are displayed with a “Verified” badge in the commit history:

This is specially important for authors and maintainers of open source software that many others rely on. If trusted contributors are signing all their commits, it makes it much harder for attackers to sneak in malicious code into projects.
Why use SSH keys for signing? #
There are three methods for signing commits and tags in git.
Historically PGP was the default choice for signing commits, encrypting emails, and other kinds of data. But GPG / PGP can be quite cumbersome and overwhelming to use and is no longer recommended for most purposes.
Luckily we can use SSH key pairs for signing our commits, which is relatively speaking a fairly new addition that many developers don’t know about. The ability to sign arbitrary data was added to OpenSSH in 20191 and support for signing commits with SSH keys was added to git in version 2.34, which came out in 2021.2
The third option for signing commits is to use S/MIME and X.509 certificate keys. This makes might make sense for environments that require a more scaleable setup and has a Public Key Infrastructure. But that is a whole different can of worms, so I will just skip over that.
SSH key pairs are more familiar to most developers since they are the same types of keys we are already using to connect and authorize to servers and platforms. And they are much easier to generate, manage, and use in practice than certificates or PGP.
Tip:
If you don’t have an SSH key pair or are using very old ones, you should strongly consider rotating them. I wrote a post recently about how to create new and secure SSH key pairs and use them with GitHub.
Prepare git for signing #
-
Configure git to use SSH instead GPG
shell git config --global gpg.format ssh -
Let git know where your (
.pub) signing key isshell git config --global user.signingkey ~/.ssh/id_ed25519.pub -
Create a file that will store trusted signatures
shell touch ~/.config/.git_allowed_signers -
Add your email and public key to the file
ini # Email # Key type # Key signature [email protected] ssh-ed25519 AAAAC3NzaC1BZFI3NTE5AAAAIPQSEV470Fi[...] -
Configure git to use this file to look for signers
shell git config --global gpg.ssh.allowedSignersFile ~/.config/.git_allowed_signers
How to sign commits #
There are two options when it comes to actually doing the signing. Set-and-forget where git does it every time or the manual option, where you chose exactly which commits are signed.
Automatic signing #
Configure git to sign all your commits:
git config --global commit.gpgsign trueManual signing #
If you prefer to control which commits are signed, you can skip the above step and do it manually each time using -S.
git commit -S -m "My commit message"Perhaps if you only want to sign commits in a work context and not for private projects or something like that. But I would discourage that as it just increases the likelihood that you will forget to do it going forward.
Testing #
It’s always a good idea to test that signing works in a non-critical repository before you start using it in your daily workflow.
For this example, I will create a new dummy repository locally and delete it afterwards.
-
Make a commit in a repository
shell mkdir test && cd test git init touch testfile git add . git commit -m "Just testing my new signature" -
Verify that the commit is signed
shell git log --show-signatureIf it worked, the commit details will say
Good "git" signature.The result should look like this:
shell $ git log --show-signature commit 5bbeeb0fe1fb2b07d71c8cf00fb1b105f432f92f (HEAD -> main) Good "git" signature for [email protected] with ED25519 key SHA256:9bDstFrkRXpCiK13fpJRd2Vk[...] Author: Your Name <[email protected]> Date: Mon Jun 19 21:39:34 2023 +0200 Just testing my new signature
If you are on MacOS and get an error that looks like this:
$ git commit -m "Some commit"

error: Load key "/var/folders/_c/2ck_whcd361g7feth13w_kxc0020gn/T//.git_signing_key_tmpCaeBpa": invalid format?

fatal: failed to write commit object
It might be because you need to load your SSH key into the ssh-agent again. You can do so using ssh-add:
ssh-add --apple-use-keychain ~/.ssh/id_ed25519Tell GitHub which key you are using #
Now that signing is working locally, you need to set it up for the git hosting services you use.
Go to your GitHub account settings, find the SSH and GPGP keys section, and add your key. (GitHub docs)
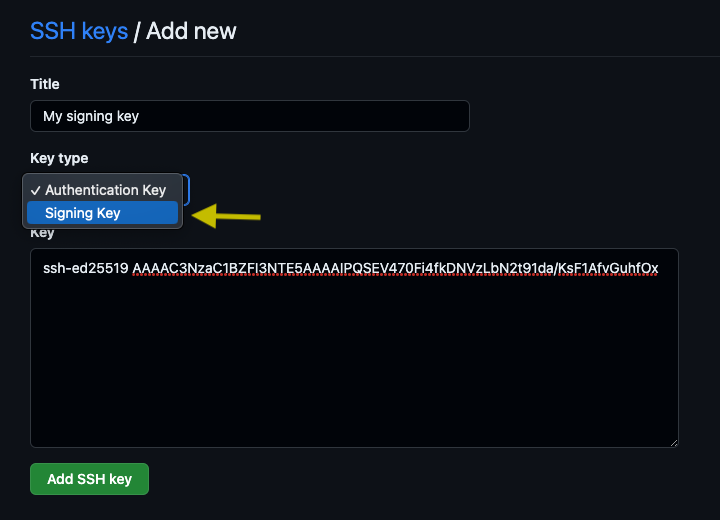
If you, like me, already use SSH keys for authenticating with GitHub and other servers, you can use the same key pair for signing as well. But you need to upload the key again and choose Signing key as the type as shown below, otherwise it will not work.
Once you started pushing signed commits to GitHub they will appear as “Verified” in the commit history:
Bonus: Protect your branches #
You can enable branch protection for your repositories on GitHub. This feature allows you to enforce rules that need to be followed before a commit can be merged into a branch.
One of the rules you can configure, is a requirement that new commits must be signed and verified. This is useful to prevent accidental pushes of unsigned commits from yourself and others.
Bonus: Vigilant mode #
If you want to go the extra mile, you can enable vigilant mode for your GitHub account. Though you should only do this if you know what you are doing.
By default, signing your commits marks them as “Verified” and unsigned commits just look like regular commits. Vigilant mode goes a step further and marks unsigned commits as “Unverified” which is a strong indicator to you and others that someting could be wrong.
-
It’s Now Possible To Sign Arbitrary Data With Your SSH Keys by Andrew Ayer ↩︎
-
From the
gitproject release notes, [ANNOUNCE] Git v2.34.0:
In addition to GnuPG, ssh public crypto can be used for object and push-cert signing. ↩︎